
Under the Assistant Technical Director (ATD) apprenticeship I was hired by DNEG as a Creature Apprentice. So I mostly explored and developed my skills within the Creature department while fulfilling the ATD apprenticeship standard. The concepts and principles pretty much work in tandem and allowed me to connect the dots that associate with what makes a good TD.
Below are some of the experiences and skills that I got to develop within the workplace, college and at home. This enabled me to bridge the gaps between the different roles and departments that led me to appreciate the VFX craft even more. Sensitive work related material are not available for public viewing only through a password protected showreel which is linked here:
CREATURE WORK
Having the opportunity to work alongside the Creature team, there are still so much more areas that are involved within the whole spectrum of creating and building creatures to life which is very intriguing to be a part of. The Creature department consists of the rigging, hair, cloth, muscle, crowd and shot sculpt stages.
ANATOMY STUDIES
At the beginning of my training in DNEG, I did studied a lot on human anatomy which is an important aspect that a Creature artist would familiarise themselves with. Having a substantial knowledge of anatomy is the foundation of replicating and recreating digital versions of any characters. A lot of the resources that were posted within the intranet wiki pages were great starting points and I found myself taking in as much information I can to really broaden my understanding of the subject area.
The post below directs to the notes and sketches I made in my workplace:
Anatomy Studies
Being in DNEG there are a plethora of resources that you get to explore and dive right into. At the start of my apprenticeship I took the opportunity to expand my knowledge learning about human anatomy. This is mainly because most of the character work, for digital-double works (replicating and introducing CG characters onto the…

RIGGING
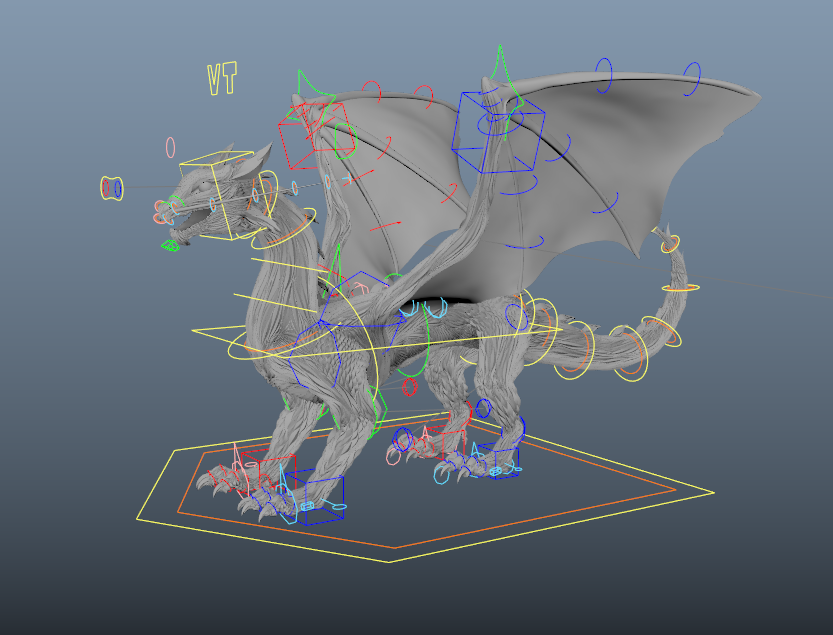
Rigging is such a fundamental role within VFX pipeline in that it binds the two disciplines MODELLING and ANIMATION together. Rigging also feeds into the TRACKING and MATCHMOVE department. And also extends their involvement with SHOTSCULPT and CFX.
The task is to build an internal structure/skeleton and set of controls from a model which can be manipulated by animators to bring out a believable performance. Having a solid understanding of how the real-world counterpart behaves is pinnacle in recreating objects and character in CG. To have solid understanding of Anatomy (study of the structure and relationship of the body) and Kinesiology (study of body movements) will help create character rigs. While having a strong foundation in mechanics can help with mechanical/vehicle rigging.
A rig is generally composed of hierarchical sets of joints that create a digital skeleton that are driven by NURBS control curves. Geometry is bounded by these joints through the process of “skinning” or “enveloping” weights. The software used in industry for rigging is Maya which will most likely rely on in-house tools that are streamlined to work within the studio’s pipeline and workflow. In DNEG we use a proprietary modular rigging interface called Pinocchio.
Riggers would need to have a clear understanding of how a model will need to deform. Relying not just on technical skill-sets but also on artistic appreciation. Early communication with the modelling team will need to be addressed by the rigger to make sure that the model follows an edge-flow topology that matches the needs of the rigger to help create good deformations. Having communication with the animation team will provide better rigging decisions and help cater to creating custom or complex rigs.

I had an opportunity to look into rigging in Houdini when Dean Henry who works in SideFX came to do some Houdini masterclasses with the ATD apprentices. The same principles still remain but it was driven by CHOPs which are channel operators.
The first rigging task that I was set was to create a first stage pass of a digital double (digi-double) body. This involved placing joints in a character and then binding the joints to the character that has controls that animators can manipulate and set key frames to create a believable performance. I became more familiar with the process of creating rigs from getting trained by my mentor which was very reassuring since I was still not confident at the time.
When it comes to rigging you’ll face countless back and forth with modelling to make sure that certain assets are named correctly, not intersecting other objects and that freeze transform is applied. Every time a model is updated you’ll need to update the rig so it is important to communicate the necessary requirements. Planning ahead of time to reduce having to go back to modelling to fix the issue and meet the standards in line with the brief. Rigs can also become heavy and slow to handle. A way to make rigs lighter to run, is to remove unused painted weight influences.
SHOTSCULPT
The work that I have helped produce during the start of my apprenticeship mainly involve the process of shot sculpt. This tasks requires gathering the cached data (.abc – alembic) from the animation and CFX (e.g. cloth simulations/muscle simulations) team as well as the shot sculpt rig that will bake the deformed blendshapes.
This process can be done in Maya and ZBrush to be able to sculpt the mesh in line with the referenced 2D scanned sequence projected through the camera. Then certain problematic areas that need fixing will need to be resolved through any sculpting method as long as it matches the output camera. The sculpts are then merged to the original mesh as a blendshape deform in that specific frame. All the blendshape sculpt fixes will override the geometry cache and interpolate to make a much more believable performance. The purpose of refining the look or fixing intersections and unsolvable deformations to be passed onto either the FX and lighting team.
CFX (HAIR)
Creature FX (CFX) is the process after rigging and animation where areas that are too heavy to compute for animation or rigging is simulated. It is creating technical animation using simulation techniques to represent a complex anatomical and material behaviour. This can be hair/fur, muscle, cloth and crowd related tasks that are done in either Houdini and/or Maya. The work that gets passed through these stages are mainly cached in alembic formats in which points of the geometry (from the rig version and version for simulation) remain the same.

I was able to sit down with one of my mentors that really helped introduce me to Vellum hair simulations using Houdini. CFX rig templates in Houdini in general do really complicated with load of subnetworks that you dive in and out of. It still is a little bit complex at first but I was able to break it down with my mentor who was Houdini hair specialist. He taught me how to create a much more simpler setup using Vellum which is a simulation framework that can be applied to hair, cloth, softbodies, balloons and grains. This is quite a remarkable tool to be able to handle and simulate different types of objects.
The procedure of creating vellum hair will be extracting the hair guide curves alembic and creating hair root points using the VEX expression:
vertexprimindex(0, @vtxnum)==0These grouped points are then bound to the geometry cached alembic data. Afterwards the wire curve and the collision geometry are plugged into the Vellum Hair Constraints node. Where I was able to change the physics properties of the such as mass, drag, stretch, bend and stiffness. There is also an option to pin points which I could plug in the roots group and make sure that the match animation is toggled on. The vellum solver is added downstream to apply additional forces like wind and gravity. And then add a Vellum postprocess node to help smoothen and detangle collisions. The sim curves are then cached out. Once the cache is processed the sculpting process can be introduced using the soft transform node. Just from that training session I was able to gain more Houdini knowledge and how to create more simplified hair sims. There are still so much that I want to learn and uncover.
Below are some of the highlights of the work we did in college with Ceylan:
Creature Masterclasses
We had an opportunity to work with Ceylan Jawara, a CG supervisor that works in a visual effects studio called One Of Us. She was able to show us the different workflows that’s centred around creature FX which is directly related to my apprenticeship in DNEG. We briefly looked into the tools and workflows that…

